
RA8889/71M/73M/76M/77延展单色位图为可变前景和背景色图形
2020-12-28
本文章主要讲解如何使用RA8889、RA8877、RA8876系列的芯片处理单色图并可扩展出不同颜色,颜色改变包括前景色和背景色,还可以使背景色为透明色。处理方法可以分为两种:1、将图片转为数组是用单片机描点写入;2、图片存入flash并用DMA调用。
注意事项:需要在芯片设置为16bpp模式下使用
方法一:单片机直接写入
第一步:首先使用瑞佑的转档软件将图片转为.h头文件并添加到工程
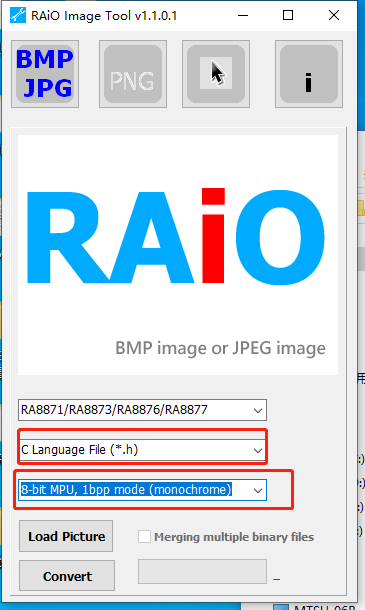
内容应为数组:
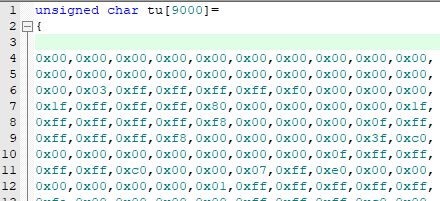
第二步:API函数调用
1、设置前景色与背景色函数实例:
**
BTE_MCU_Write_ColorExpansion_MCU_8bit(0,1024, 0,50,720,100,color16M_red,color16M_green,tu);
函数解释:
**
void BTE_MCU_Write_ColorExpansion_MCU_8bit
        (

        unsigned long Des_Addr //start address of Destination

        ,unsigned short Des_W //image width of Destination (recommend = canvas image width)

        ,unsigned short XDes //coordinate X of Destination

        ,unsigned short YDes //coordinate Y of Destination

        ,unsigned short X_W //Width of BTE Window

        ,unsigned short Y_H //Length of BTE Window

        ,unsigned long Foreground_color

        /*Foreground_color : The source (1bit map picture) map data 1 translate to Foreground color by color expansion*/

        ,unsigned long Background_color

        /*Background_color : The source (1bit map picture) map data 0 translate to Foreground color by color expansion*/

        ,const unsigned char *data // 8-bit data

        )
2、改变前景色并设置背景色为透明色实例:
**
BTE_MCU_Write_ColorExpansion_Chroma_key_MCU_8bit(0,1024, 0,0,200,100,0xff00,tu);
函数解释:
**
void BTE_MCU_Write_ColorExpansion_Chroma_key_MCU_8bit
       (

       unsigned long Des_Addr //start address of Destination

       ,unsigned short Des_W //image width of Destination (recommend = canvas image width)

       ,unsigned short XDes //coordinate X of Destination

       ,unsigned short YDes //coordinate Y of Destination

       ,unsigned short X_W //Width of BTE Window

       ,unsigned short Y_H //Length of BTE Window

       ,unsigned long Foreground_color

       /*Foreground_color : The source (1bit map picture) map data 1 translate to Foreground color by color expansion*/

       ,const unsigned char *data //8-bit data

       )
方法二:将图片烧入FLASH
第一步:通过瑞佑的转档软件将图片转为bin档并烧入FLASH
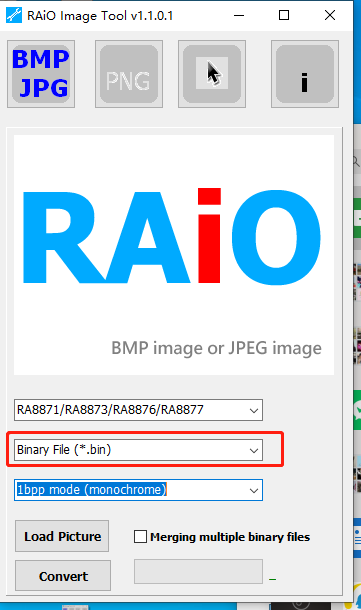
第二步:API函数调用
1、改变背景色和前景色
**
/设定第二个图层作为DMA图层,只能设置为8bpp或者16bpp模式/
    Canvas_Image_Start_address(1024*600*3);  //第二个图层

    Memory_8bpp_Mode();

    DMA_24bit(1,0,0,0,50,240,50,0);


    /*设置S0图层*/

    BTE_S0_Color_8bpp(); //[92h] Source_0 Color Depth

    BTE_S0_Memory_Start_Address(1024*600*3);

    BTE_S0_Image_Width(1024);

    BTE_S0_Window_Start_XY(0,0);
**
/设置显示图层,可设为16bpp或24bpp/
    BTE_Destination_Color_24bpp(); //[92h] Destination Color Depth

    BTE_Destination_Memory_Start_Address(0);

    BTE_Destination_Image_Width(1024);

    BTE_Destination_Window_Start_XY(0,0);

    Canvas_Image_Start_address(0);

    Memory_24bpp_Mode();

    Foreground_color_16M(0xff0000);

    Background_color_16M(0x00ff00);

    BTE_Window_Size(400,240);

    BTE_Operation_Code(0xE);

    BTE_ROP_Code(7);

    /*开启BTE功能*/

    BTE_Enable();

    Check_BTE_Busy();
2、改变前景色透明背景色
**
/设定第二个图层作为DMA图层,只能设置为8bpp或者16bpp模式/
    Canvas_Image_Start_address(1024*600*3);  //第二个图层

    Memory_8bpp_Mode();

    DMA_24bit(1,0,0,0,50,240,50,0);
**
/设置S0图层/
    BTE_S0_Color_8bpp(); //[92h] Source_0 Color Depth

    BTE_S0_Memory_Start_Address(1024*600*3);

    BTE_S0_Image_Width(1024);

    BTE_S0_Window_Start_XY(0,0);


    /*设置显示图层,可设为16bpp或24bpp*/

    BTE_Destination_Color_24bpp(); //[92h] Destination Color Depth

    BTE_Destination_Memory_Start_Address(0);

    BTE_Destination_Image_Width(1024);

    BTE_Destination_Window_Start_XY(0,0);

    Canvas_Image_Start_address(0);

    Memory_24bpp_Mode();

    Foreground_color_16M(0xff0000);


    BTE_Window_Size(400,240);

    BTE_Operation_Code(0xF);   //Chroma_key 透明背景色

    BTE_ROP_Code(7);

    /*开启BTE功能*/

    BTE_Enable();

    Check_BTE_Busy();
效果展示

应用
用户可以借此功能,将常用的数字、符号、字母等预先设计好多套尺寸并保存到FLASH中备用,就相当于矢量字库了!后续调用起来就相当方便。
分享到: